Every successful construction or home improvement project relies on precise measurements. The difference between professional results and amateur work often comes down to one essential tool. Mastering this instrument is fundamental for quality and structural integrity.
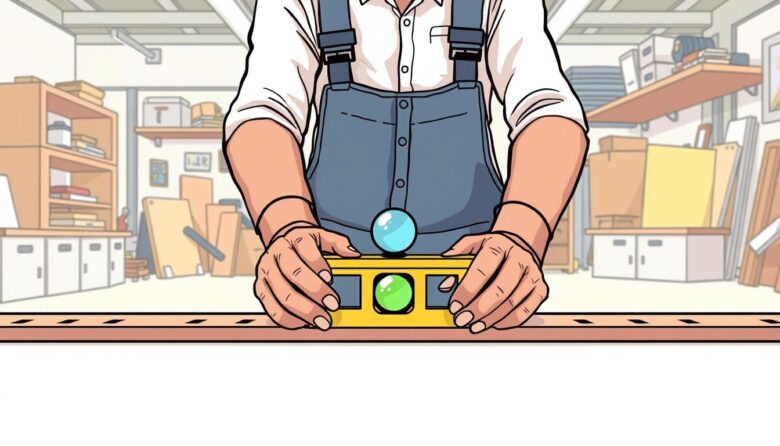
Spirit levels, also called bubble levels, are the most common and versatile type. They use a liquid-filled vial with an air bubble to indicate level or plumb surfaces. Available in various lengths, they suit tasks from hanging pictures to framing walls.
This guide explores different level types, from traditional spirit models to advanced laser and digital tools. You will learn which tool best fits your specific project requirements. We cover proper positioning techniques and how to interpret readings accurately.
Our goal is to make professional-leveling techniques accessible to everyone. Whether you are a seasoned pro or a DIY enthusiast, this resource will transform your approach. Achieve perfectly aligned surfaces and true lines on every job.
Understanding the Basics of Leveling Tools
Professional results begin with understanding the fundamental tools that ensure straight lines and true surfaces. These instruments provide the foundation for quality work across various projects.
Key Features of Spirit Levels and Bubble Levels
Quality spirit levels feature sturdy aluminum or reinforced plastic frames that resist warping. This durability maintains accuracy over time. The precision of these tools typically reaches within 0.5 millimeters per meter.
Clear vials with reliable liquid formulation prevent excessive bubbling. Multiple vials allow measurements for horizontal, vertical, and 45-degree angles. Shock-absorbing end caps and magnetic edges enhance functionality and protection.
Different Types of Levels for Various Applications
Carpenter’s levels range from 2 to 6 feet, serving as excellent all-purpose tools. They handle diverse project sizes effectively.
Torpedo levels offer compact portability for tight spaces. These smaller tools often include magnetic strips and illumination features. They excel in plumbing applications and specialized tasks.
Mason’s levels measure four feet or longer for extensive surfaces like walls. While perfect for large-scale masonry work, they lack versatility for smaller objects.
Understanding these different types helps select the right tool for each specific task. Proper choice ensures accurate measurements whether checking plumb surfaces or aligning frames.
Using a Level Correctly: Techniques and Tips
Accurate measurements depend not just on quality equipment but on proper application techniques. Mastering these methods ensures professional results across all your projects.
Positioning Your Level for Accurate Readings
Start by cleaning both the tool and measured surface. A quick brush with your gloved hand removes debris that affects sensitivity. Dirt accumulation in edges compromises precision.
Place the instrument firmly in the center of your object. Ensure full contact across its entire length. This applies to horizontal surfaces like decks and vertical elements like walls.
Interpreting Bubble and Line Markings
The bubble’s position within the vial tells the story. When centered between guideline markings, you achieve perfect level. Movement left indicates higher left side; right movement shows elevated right side.
Remember the critical distinction: horizontal vials measure level surfaces while plumb vials check vertical alignment. Professional verification involves taking multiple readings along the surface.
Use the end-for-end flip method for confirmation. Rotate the tool 180 degrees to validate consistent bubble position. This technique confirms your tool’s accuracy.
Step-by-Step Guide for Accurate Measurements
Before taking any readings, meticulous preparation of both your instrument and work area guarantees reliable results. This systematic approach prevents errors that could compromise your entire project.
Preparing Your Surface and Tool Before Use
Start by thoroughly cleaning your level’s edges and base. Remove all accumulated dirt and debris that can create gaps between the tool and measured surface. A clean contact point ensures optimal accuracy.
Simultaneously prepare your work surface by brushing away dust and wiping down the area. This dual cleaning process creates the foundation for precise measurements. Proper preparation saves time and prevents rework.
For very wide or tall surfaces, standard levels may prove inadequate. Consider investing in a level at least one meter long for versatility. Alternatively, rest your level on a perfectly straight edge to extend measurement reach.
When working with uneven surfaces, use shims or adjustable feet to achieve level readings. For curved surfaces, employ straight edges in conjunction with your level. Magnetic features provide hands-free operation on metal surfaces.
Proper positioning and support are critical, especially for longer levels. Support both ends during measurement to prevent sagging. Maintain firm, consistent contact across the level’s entire length.
Verify your readings by checking multiple positions along the surface. Reposition the instrument from one end to the other, comparing results. This verification process identifies inconsistencies indicating surface irregularities or tool calibration issues.
Achieving a truly level surface requires methodical preparation and patient verification. Each careful measurement contributes to professional-quality work that stands the test of time.
Exploring Laser, Digital, and Alternative Level Options
Modern construction demands tools that deliver precision across large distances. Advanced technology offers solutions beyond traditional bubble models.
Laser instruments project bright beams onto surfaces. This creates visible reference lines for accurate alignment. They excel in large-scale projects where traditional tools fall short.
Setting Up and Adjusting Laser Levels
Begin by mounting your device on a stable tripod. Position it near the center of your work area. Self-leveling models automatically find true horizontal or vertical planes.
For manual units, adjust until the beam aligns with your starting point. Mark reference points with pencil before beginning work. This ensures continuity if the device gets disturbed.
Comparing Laser Levels, Digital Models, and Traditional Spirit Levels
Each tool type serves distinct purposes. Laser levels provide unmatched speed for long-distance work. They project lines over hundreds of feet with perfect consistency.
Digital models measure angles with extreme precision. They display readings to tenths of a degree. These are ideal for complex projects like roof pitches.
Traditional spirit levels remain reliable for general tasks. Choose your tool based on project size, required accuracy, and budget considerations.
Level Maintenance, Calibration, and Troubleshooting Strategies
A well-maintained level delivers accurate readings project after project, saving time and materials. Regular care prevents measurement errors that compromise your work quality.
Checking and Calibrating Your Level for Consistency
Perform the simple 180-degree rotation test to verify your tool’s accuracy. Place it on a flat surface and note the bubble’s position. Rotate the instrument end-for-end and check again.
If the bubble shows the same reading both times, your tool maintains proper calibration. When positions differ significantly, adjustment or replacement becomes necessary.
Strategies for Dealing with Inaccurate Readings
For levels with adjustable vials, use calibration screws to correct deviations. Adjust until the bubble reads consistently in both normal and rotated positions.
Non-adjustable models showing significant errors require replacement. Regular cleaning after each use preserves precision over time. Store your tools in protective cases to prevent damage.
Common troubleshooting steps include:
- Cleaning debris from level edges and surfaces
- Checking for vial damage or liquid evaporation
- Verifying battery power in digital models
- Inspecting frames for bends or warping
Final Insights for Perfectly Level Projects
The distinction between adequate and exceptional workmanship often lies in proper tool selection and application. Choosing the right spirit level for each task prevents cumulative errors that compromise larger construction work.
For small home projects, a standard 2-foot level works well. But extending lines over distance requires longer tools or laser alternatives. Each project type demands specific approaches for accurate measurements.
Consistent technique ensures reliable results. Verify your tool’s accuracy with the end-for-end flip method. Proper bubble interpretation confirms true level surfaces and plumb walls.
Mastering these fundamentals elevates every construction endeavor. Whether tackling DIY home improvements or professional builds, these principles guarantee flawlessly level outcomes.


